TensorFlow学习笔记(0):环境配置与版本兼容性解析
Posted Updated 
TensorFlow学习笔记封面
By
6 min read
TensorFlow学习笔记(0):环境配置与版本兼容性解析
本系列博客将记录我在学习 TensorFlow 过程中的经验和心得。从环境配置到实际应用,希望能为其他学习者提供有价值的参考。
一、项目介绍
在开始 TensorFlow 学习之旅之前,我选择了一个非常优质的学习资源:TensorFlow Examples 项目。这个项目提供了从基础到进阶的多个实例,包括:
- 线性回归
- 逻辑回归
- 多层感知器
- 卷积神经网络
- 循环神经网络等
每个示例都配备了详细的代码注释,非常适合初学者循序渐进地学习。
二、环境配置与版本兼容性
1. 版本兼容性问题分析
在初次运行示例代码时,遇到了以下错误:
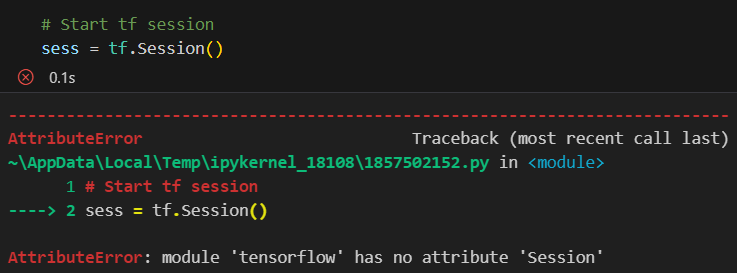 TensorFlow 1.x 与 2.x 版本不兼容错误
代码分析:
1
2
3
4
import tensorflow as tf
hello = tf.constant('Hello, TensorFlow!')
sess = tf.Session()  # 这行代码在 TF 2.x 中会报错
print(sess.run(hello))
2. 解决方案
针对这个版本兼容性问题,我们有三种可选的解决方案:
方案一:升级代码到 TensorFlow 2.x
1
2
3
4
# 升级后的代码
import tensorflow as tf
hello = tf.constant('Hello, TensorFlow!')
print(hello.numpy())  # 使用 Eager Execution 模式
优点:
- 使用最新的 API
- 更简洁的代码结构
- 更好的性能表现
方案二:使用兼容模式
1
2
3
4
5
6
# 启用 TF 1.x 兼容模式
import tensorflow as tf
tf.compat.v1.disable_eager_execution()
hello = tf.constant('Hello, TensorFlow!')
sess = tf.compat.v1.Session()
print(sess.run(hello))
适用场景:
- 旧项目迁移
- 依赖 TF 1.x API 的代码
- 过渡期使用
方案三:使用项目提供的 TensorFlow 2.x 示例
1
2
cd tensorflow_v2/notebooks/
jupyter notebook
推荐原因:
- 代码已经过优化
- 完整的文档支持
- 更好的学习体验
3. 版本验证
完成环境配置后,运行以下代码验证:
1
2
import tensorflow as tf
print(tf.__version__)  # 输出版本号
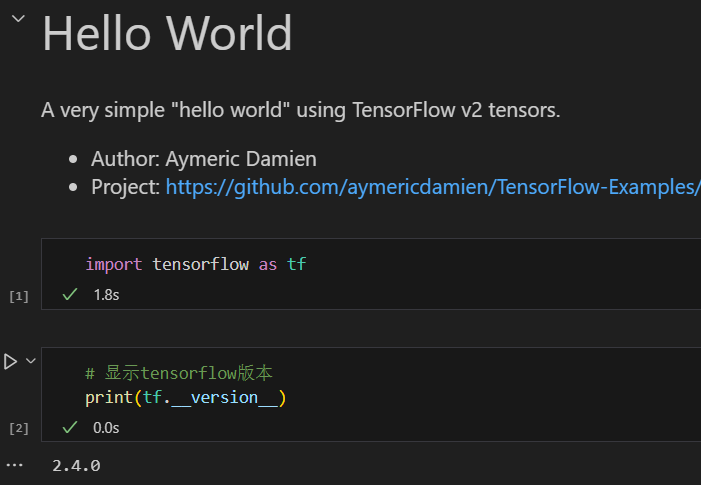 TensorFlow 2.4.0
三、TensorFlow 2.x 主要特性
在开始实际编码之前,让我们了解 TensorFlow 2.x 的几个重要特性:
- Eager Execution
- 立即执行模式
- 动态图计算
- 更直观的调试体验
- 统一的 Keras API
- 简化模型构建流程
- 标准化模型接口
- 丰富的预置层和模型
- 自动微分系统
- 支持动态计算图
- 更灵活的梯度计算
- 优化器性能提升
四、TensorFlow 基础知识总结
1. 张量(Tensor)基础
1.1 张量的定义
1
2
3
4
5
# 创建张量的几种方式
scalar = tf.constant(100)                    # 标量
vector = tf.constant([1, 2, 3, 4])          # 向量
matrix = tf.constant([[1, 2], [3, 4]])      # 矩阵
tensor = tf.zeros([2, 3, 4])                # 3D张量
1.2 张量的属性
- 形状(Shape):张量中每个维度的大小
- 维度(Rank):张量的维数
- 数据类型(dtype):张量中元素的类型
1
2
3
print(tensor.shape)      # 形状
print(tensor.ndim)       # 维度
print(tensor.dtype)      # 数据类型
2. 自动微分机制
2.1 梯度带(GradientTape)
1
2
3
4
x = tf.Variable(3.0)
with tf.GradientTape() as tape:
    y = x * x
dy_dx = tape.gradient(y, x)  # 计算 dy/dx
2.2 持久梯度带
1
2
3
4
5
with tf.GradientTape(persistent=True) as tape:
    y1 = x * x
    y2 = x * x * x
dy1_dx = tape.gradient(y1, x)
dy2_dx = tape.gradient(y2, x)
3. 变量管理
3.1 创建变量
1
2
3
4
5
6
7
8
# 变量初始化
v1 = tf.Variable(1.0)
v2 = tf.Variable([1, 2, 3])
v3 = tf.Variable(tf.random.normal([3, 3]))

# 变量赋值
v1.assign(2.0)
v2[0].assign(5)
3.2 变量作用域
1
2
3
with tf.name_scope("layer_1"):
    w1 = tf.Variable(tf.random.normal([2, 2]), name='weights')
    b1 = tf.Variable(tf.zeros([2]), name='biases')
4. 计算图基础
4.1 动态图
1
2
3
4
5
6
@tf.function
def compute(x, y):
    return tf.matmul(x, y)

# 函数装饰器会自动转换为静态图
result = compute(tf.ones([2, 2]), tf.ones([2, 2]))
4.2 条件和循环
1
2
3
4
5
@tf.function
def simple_loop(x):
    for i in tf.range(10):
        x = x + i
    return x
5. 数据管道(tf.data)
5.1 创建数据集
1
2
3
4
5
6
7
8
9
10
11
12
13
14
# 从张量创建数据集
dataset = tf.data.Dataset.from_tensor_slices([1, 2, 3, 4, 5])

# 从生成器创建数据集
def gen():
    for i in range(5):
        yield (i, i*2)
dataset = tf.data.Dataset.from_generator(
    gen,
    output_signature=(
        tf.TensorSpec(shape=(), dtype=tf.int32),
        tf.TensorSpec(shape=(), dtype=tf.int32)
    )
)
5.2 数据集转换
1
2
3
4
# 常用转换操作
dataset = dataset.shuffle(buffer_size=100)  # 打乱数据
dataset = dataset.batch(32)                 # 批处理
dataset = dataset.prefetch(1)               # 预加载
6. 模型构建基础
6.1 层的创建
1
2
3
4
# 常用层
layer1 = tf.keras.layers.Dense(64, activation='relu')
layer2 = tf.keras.layers.Conv2D(32, 3, activation='relu')
layer3 = tf.keras.layers.Dropout(0.5)
6.2 自定义层
1
2
3
4
5
6
7
8
9
10
11
12
13
14
class MyLayer(tf.keras.layers.Layer):
    def __init__(self, output_dim, **kwargs):
        super(MyLayer, self).__init__(**kwargs)
        self.output_dim = output_dim

    def build(self, input_shape):
        self.kernel = self.add_weight(
            shape=(input_shape[-1], self.output_dim),
            initializer='uniform',
            trainable=True
        )

    def call(self, inputs):
        return tf.matmul(inputs, self.kernel)
7. 性能优化技巧
- 内存优化
- 使用
tf.float32而不是tf.float64 - 及时释放不需要的张量
- 使用
tf.data管道进行数据预处理
- 使用
- 计算优化
- 使用
@tf.function装饰器 - 批量处理数据
- 利用 GPU 加速计算
- 使用
- 模型优化
- 使用合适的批次大小
- 选择适当的优化器
- 实现早停机制
注意:以上是 TensorFlow 2.x 的基础知识点总结,深入学习还需要配合实际项目练习和官方文档查阅。
This post is licensed under CC BY 4.0 by the author.